깃허브 블로그(5) 블로그 커스터마이징
사이트 환경설정
- jekyll은 프로젝트 root에 있는 구성파일
_config.yml을 변경해서 전체 사이트의 환경 설정을 할 수 있다.
#_config.yml 파일을 수정하면 기본 스킨을 변경할 수 있다.
minimal_mistakes_skin    : "air" #"default", "air", "aqua", "contrast", "dark", "dirt", "neon", "mint", "plum", "sunrise"
locale은 해당 사이트내 모든 페이지의 기본언어를 설정한다.title은 말 그대로 사이트의 제목이고,url은 사이트의 기본 호스트명과 프로토콜이다.
locale                   : "ko-KR"
title                    : "2nd Memory Unit"
title_separator          : "-"
subtitle                 : # site tagline that appears below site title in masthead
name                     :
description              :
url                      : "https://shellcode777.github.io"
author메뉴를 수정하면 블로그 왼쪽의 저자 정보를 수정할 수 있다.name은 저자 이름을 변경하고avatar에 사진경로를 넣으면 본인이 원하는 사진이 사이트 저자란에 등록되고 저자의 소개, 위치, sns 링크 등을 수정할 수 있다.
author:
  name             : "보조기억장치"
  avatar           : "/assets/images/charmender.JPG"
  bio              : "배웠으면 기록해야 써먹지"
  location         : #"South Korea"
- 수정된 저자 정보

- https://mmistakes.github.io/minimal-mistakes/docs/configuration/ 해당 url로 가면 기타 여러가지 기본설정의 메뉴와 설명 등이 있는 가이드가 있다.
page
- 페이지는 컨텐츠를 구성하는 가장 기본적인 요소, 그룹화 되어있지 않은 단독 컨텐츠를 구성하는데 쓰인다.
- 페이지를 추가하려면
root디렉토리에 html 또는.md확장자 파일을 추가하면 빌드시 HTML로 변환된다. - root 디렉토리에서 페이지 URL는 다음과 같다.
.
├── about.md    # => http://example.com/about.html
├── index.html    # => http://example.com/
└── contact.html  # => http://example.com/contact.html
navigation 수정
- jekyll 사이트는
_data/navigation.yml파일을 수정하여 상단 navigation 메뉴 또는 side bar 메뉴를 커스텀 할 수 있다.
main:
    - title: "TEST navigation"
      url: https://www.naver.com/
    - title: "Daum"
      url: https://www.daum.com
-
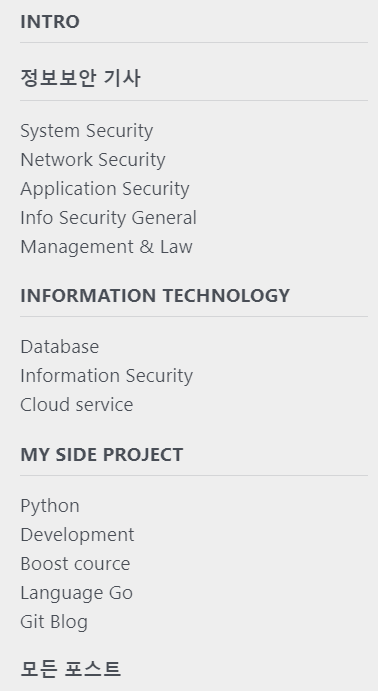
side bar 메뉴를 사용 하기 위해서는
_data/navigation.config과_config.yml파일도 수정해야 한다.
#_data/navigation.yml
side_nav:
    - title: "INTRO"
      url: /intro/
    - title: "정보보안 기사"
      url: /about/
      children:
        - title: "System Security"
          url: /infosecu/system/
        - title: "Network Security"
          url: /infosecu/net/
        - title: "Application Security"
          url: /infosecu/app/
        - title: "Info Security General"
          url: /infosecu/general/
        - title: "Management & Law"
          url: /infosecu/mgmtlaw/

    - title: "Information Technology"
      url: /it/
      children:
        - title: "Database"
          url: /it/db/
        - title: "Information Security"
          url: /it/secu/
        - title: "Cloud service"
          url: /it/cloud/

    - title: "MY Side Project"
      #url: /sdpjt/
      children:
        - title: Python
          url: /sdpjt/python/
        - title: Development
          url: /sdpjt/dev/
        - title: Boost cource
          url: /sdpjt/boost/
        - title: Language Go
          url: /sdpjt/langgo/
        - title: Git Blog
          url: /sdpjt/gitblog
    - title: "모든 포스트"
      url: /categories/
- defaults 값에
sidebar:값을 넣어주면 왼쪽에 네비게이션 메뉴가 생긴다. - navigation.yml에 지정한 값
side_nav(사용자 지정 고유 임의의 값)과nav: "side_nav"의 값, sidebar의 nav 키 값이 동일해야 한다.
# _config.yml
defaults:
  # _posts
  - scope:
      path: ""
      type: posts
    values:
      layout: single
      author_profile: true
      read_time: false
      comments: # true
      share: true
      related: false
      sidebar:
        nav: "side_nav"


